As I have been using OMNICHROMA Flow more routinely in daily dentistry, my confidence in its capabilities has increased. I am continually striving to do the least invasive dentistry I possibly can and having a direct composite material that is versatile across the broad spectrum of procedures is exceedingly helpful. In this blog article, I will share why and how I use OMNICHROMA, OMNICHROMA Flow, and BLOCKER Flow in posterior restorative cases.
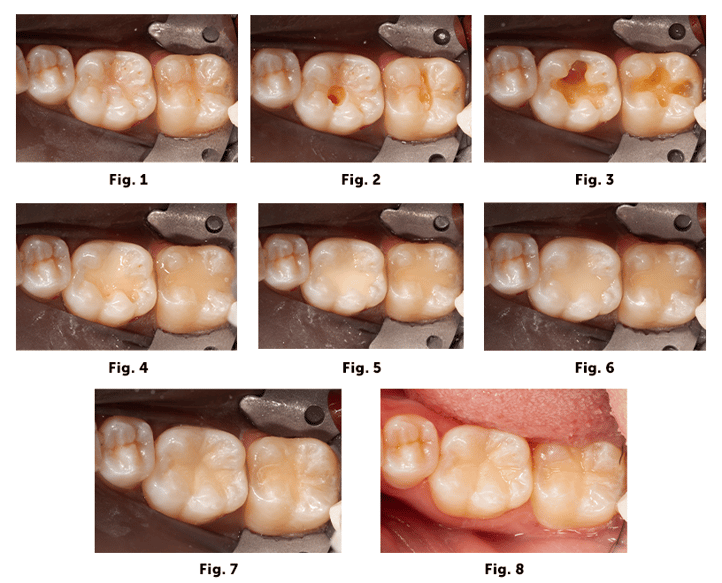
In this first case there were small to moderate sized cavities on the occlusal surfaces of teeth 18 and 19 (Fig. 1 & 2). After removing the decay the dark reactionary dentin on the pulpal floor was quite visible on 19 and just a small area on 18 (Fig. 3). Whenever I see any discolored dentin, whether it be from decay or previous restorations staining the dentin, I use the BLOCKER Flow as a base layer to block out the darkness from showing through in the final restoration (Fig. 4). The thickness of this layer is dependent upon the darkness of the area. The darker it is the thicker the BLOCKER layer will need to be. However, the effectiveness of the BLOCKER Flow is such that it doesn’t require a thickness that will reach the cavosurface margin. Sometimes I have to do this in several layers to keep the curing depth of the material less than 2 mm. But in general, the final thickness of the Blocker layer will range between 0.5-3.0 mm. Once the BLOCKER Flow is completed, then I can use OMNICHROMA and/or OMNICHROMA Flow to finish layering the restoration (Fig. 5 & 6). In this case, I decided to use OMNICHROMA Flow and did so in several layers as well by placing a little at a time on each cusp area up to the cavosurface margin. If the preparation was smaller, then I would’ve done it in one or two layers only. After final light curing, I used a fine grit diamond bur to create occlusal anatomy and then polished it (Fig. 7 & 8).
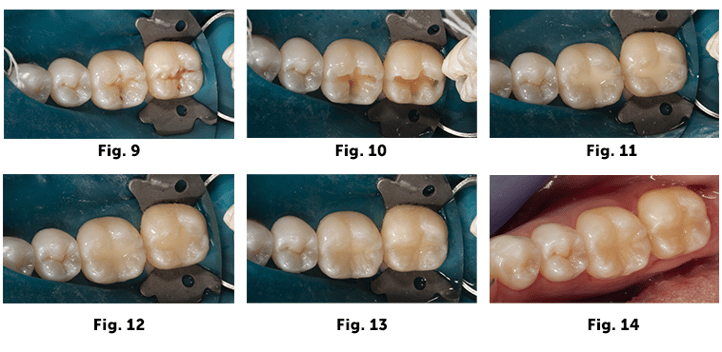
 In the second case, also on teeth 18 and 19, after the decay was removed, the dentin didn’t appear to have any darkness that required a layer of BLOCKER Flow. So, in this case I only used OMNICHROMA Flow in the same manner described above, layering it into each cavity preparation in two or three layers to manage shrinkage stresses (Fig. 9, 10, 11, 12, 13, & 14). I felt comfortable restoring entirely with OMNICHROMA Flow in these smaller restorations that were not deep or broad.

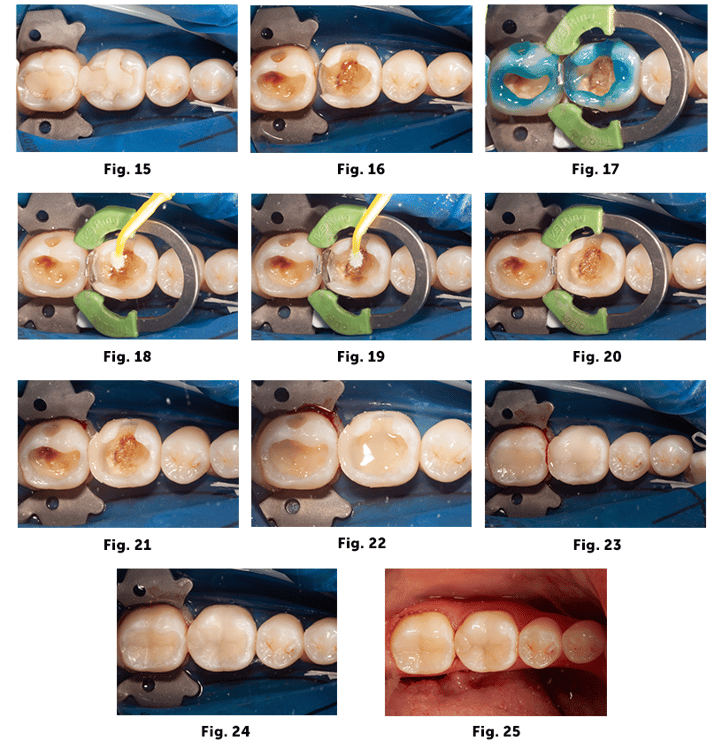
The final case shows an example of restoring larger cavities on teeth 18 and 19. Both of these teeth had existing large composites which were failing (Fig. 15). After the old restorations were removed, the pulpal floor was quite dark from reactionary dentin (Fig. 16). After air abrasion and positioning of the sectional matrix system, selective acid etching was completed followed by Microprime desensitizer and Tokuyama Universal Bond (Fig. 17, 18, & 19). The distal proximal wall was first established using OMNICHROMA (Fig. 20) after which the ring and sectional matrix were removed for easier access for subsequent layering (Fig. 21). BLOCKER Flow was then used to cover the dark pulpal floor which was done in two layers per tooth to avoid each layer being too thick or broad for a single light cure (Fig. 22). In this case the OMNICHROMA BLOCKER Flow layer was probably about 1.0-1.5mm thick. OMNICHROMA was then used to fill the remainder of the cavities in three or four layers per tooth (Fig. 23). I could have used OMNICHROMA Flow but opted for OMNICHROMA this time because of the size of the restorations and desired the higher strength of regular OMNICHROMA. Occlusal anatomy was then created with a fine diamond bur and composite polishers (Fig. 24 & 25).

In summary, I use BLOCKER Flow as a pulpal floor liner when I need to block out any dark areas of the preparation, such as dark reactionary dentin, or when replacing old amalgam fillings that have stained pulpal dentin. In smaller cavity preparations I will restore fully with OMNICHROMA Flow. In larger cavities, I will use OMNICHROMA.
Slide Legend:
1 - Preop occlusal view of teeth #18 and #19 with old failing composite fillings.2 - Initial removal of old composite restorations revealing recurrent decay.
3 - Completed cavity preparations showing dark pulpal floor where reactionary dentin responded to the recurrent decay.
4 - Tooth #19 shows the BLOCKER Flow applied and light cured along with a small layer of uncured OMNICHROMA Flow within the lingual groove area filled up to the cavosurface margin. The BLOCKER Flow is visible on the pulpal floor. Tooth #18 had already been filled to completion with BLOCKER Flow and OMNICHROMA Flow.
5 - Tooth #19 filled to completion with OMNICHROMA Flow before light cure.
6 - Tooth #19 filled to completion with OMNICHROMA Flow after light cure.
7 - Completed restoration after shaping and polishing.
8 - Completed restoration after shaping and polishing and after removing the rubber dam.
9 - Preop occlusal view of teeth #18 and #19 with decay in grooves.
10 - Tooth preparations after decay removed followed by air abrasion.
11 - OMNICHROMA Flow before cure.
12 - OMNICHROMA Flow after cure.
13 - Final restorations after final shaping and polishing.
14 - Immediate post op after removing rubber dam.
15 - Preop occlusal view of Teeth #18 and #19 with old failing composite restorations.
16 - Cavity preparations after removal of old restorations and recurrent decay. The pulpal floor was dark from reactionary dentin.
17 - Sectional matrix in place and selective acid etch technique was used.
18 - Microprime desensitizing agent scrubbed into pulpal floor.
19 - Tokuyama Universal Bonding Resin.
20 - OMNICHROMA placed and light cured on the distal proximal box of tooth #19.
21 - With the distal proximal wall now established, the section matrix system was removed to allow easier access to fill the remainder of the cavity preparations.
22 - BLOCKER Flow was added in two layers at 1mm or less thickness until the dark pulpal floor was not showing through. In this case tooth #18 and #19 were about 1.5mm thick.
23 - OMNICHROMA was then sculpted and cured in incremental layers.
24 - Final layer of OMNICHROMA in place and cured.
25 - Final post op occlusal view with rubber dam removed.

